Monday 31 August 2009

Amazing August offer.......Free ribbons ! ! ! ! ! ! !

Please note that this post will remain at the top of this page until the 31st August when this very special offer finishes.
For more up to date posts please scroll down the page


Do you love ribbon, would you love a FREE ribbon bundle even more ????????????

For the month of August ONLY you can earn free ribbons as a special offer from Stampin' Up!

These gorgeous ribbons are very special as they are not even available in the current catalogue. The ribbon bundle consists of 9.1 metres EACH of Certainly Celery 5/8" Poly-twill Ribbon and So Saffron 5/8 Grosgrain Ribbon.

You can earn this ribbon bundle in 2 ways. As a customer you just need to place an order with me for £45 (before postage)and you will receive one ribbon bundle pack completely free of charge. The other way to earn this set is to HOST a £300 workshop/ party, so if you have a group of friends and would like to host a party please email me to arrange a workshop date asap.

Please remember that this ribbon, as with all Stampin' Up ribbon, matches perfectly with the range of inks, cardstock and marker pens to give that ultimate perfectly co-ordinated look.
Dont miss out on this fabulous offer, email me today to place your order.

Tuesday 25 August 2009

December Picnic anyone ?


In my class this week we are all making picnic baskets and in addition my ladies will be rubber stamping on candles for the first time.
Having just finished preparing the materials packs and class instructions for the Pumpkin Pie set we are making on Thursday, I decided to make a completely different one using some of my Retired SU Wintergreen papers and Always Artichoke cardstock. I love the sturdiness of this basket and have decided I am going to go ahead and make a few to house Christmas gifts for family and friends regardless of the fact that you don't usually have picnics in December. It doesn't matter to me that they are called a picnic basket LOL
A picnic basket template by Lauren Meader is available for purchase at Papertrey Ink

Sunday 23 August 2009

Inky Fingers

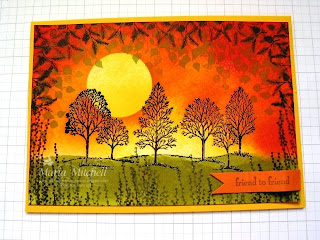
I thought I would again share something a little different with you today. I haven't seemed to have a lot of time to actually "play/ experiment" in my craft room lately but I did make this card and I am quite pleased with the effect.

I began by stamping the trees on Whisper White cardstock in versamark and basic black ink and embossed them using clear embossing powder. I then tore a sheet of plain copier paper and used it to mask the cardstock whilst I sponged on the Old Olive ink for the grassy area. Using that same mask, turned over the other way to cover the green I had just sponged, I covered the top half of my cardstock with Summer Sun ink. I cut a 1 3/8" circle out of a sticky post it note and used it to create a sun in the sky area, slightly overlapping the far left trees. I then sponged over the whole sky area using Pumpkin Pie blending it softly in some areas with the Summer Sun to create a mottled effect. I finished off by using Really Rust along the outer edges and then using a very soft tissue I buffed up the embossed trees to remove the excess ink. I then over stamped the leaves and flowers all around the edge to give the effect of a foliage frame.
I haven't really experimented a lot with this ink effect but as it has turned out well I will definitely be practising more in the future. NEXT TIME THOUGH I will be using those surgical type gloves as I got my fingers totally covered with ink.
Please feel free to leave your comments and tips

Saturday 22 August 2009

Time out ! ! ! !

Unfortunately I am not sharing a card creation with you today as I have not been able to get a spare moment to craft over the past four days. I do usually get withdrawal symptoms if I don't get into my craft room for at least a short time everyday, yesterday was an exception as we took my Great Niece out for the day which was just a fulfilling.
We went to Lakeland Animal Park in the Lake District for the day. On the drive there we had bouts of torrential rain but luckily we only had one more really bad shower just after we arrived and then it was gorgeous weather for the rest of the day. I took this giraffe photo which shows how sunny it was and how beautiful the blue skies looked with those cotton wool fluffy clouds.

I am hoping to get some serious crafting done later today and tomorrow as I have two classes to prepare for Thur and Fri. I will show the class samples once I have them made.

Tuesday 18 August 2009

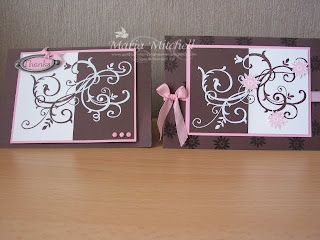
Baroque Split Negative


My card to share with you today is using the split negative technique.

I started by stamping the Baroque swirl image twice. The 1st onto Whisper White using Versamark and Chocolate Chip ink and then covered with Clear Embossing powder and heated. The second time I stamped using Versamark onto Chocolate Chip card and covered with White Embossing powder and heated. I then slit each image down the middle and joined a piece of each colourways together.

As you can see you get two cards out of this technique by using both sides of each of the colours stamped.

I then made two different cards by added different embellishments to each. I hope you like this technique as much as I enjoyed making the cards.

Tuesday 11 August 2009

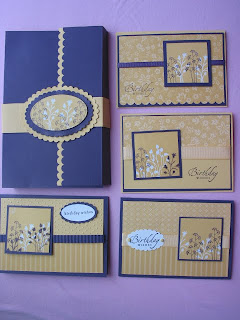
Pocket Silhouettes Wallet Class


Just thought I would show you what my ladies will be making this morning at class. We are making the wallet and 4 cards and all using the resist stamping technique. This class was requested by two of the ladies as they are relatively new to stamping and have not done the resist method before. This Pocket Silhouettes stamp set lends itself perfectly to this technique.


And especially for Jenny.......I have your gloves ready so you wont get inky lol !

Friday 7 August 2009

Scallop Square Box


Just thought I would share with you a little decorated box I have made. The stamps are from Playful Petals set and I made the scallop box topper using my scallop edge punch and a 3 x 3 inch piece of Pretty in Pink cardstock. You just line up the centre point of your scallop punch with the centre of each of the four sides and punch out just once for each side.
I think this is so pretty in comparison to just a plain top layer. You can adjust to any size.

Sunday 2 August 2009

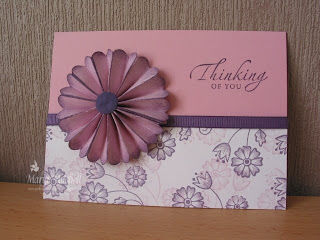
At last a card to share


I was up at 7am today and decided it was about time I got a card made....not a class card just a card for my own pleasure.

I absoloutely love the "Mr and Mrs" stamp set so that was the set my hand reached for today. The detail on the flowers is so crisp and clear so I have just randomly stamped on Whisper White in Pale Plum and Perfect Plum. I came across this folded flower over on Splitcoast Stampers. There are lots of samples using designer series papers which are beautiful but I wanted a plain and simple purple flower to go with my stamped background so I used whisper white cardstock ( this is slightly thinner than the coloured sort so easier for the folding) I scalloped one edge with the scallop edge punch, then used my brayer and lightly inked the strip in Pale Plum. I then sponged the edges and the creases in Perfect Plum.
This whole card took me less than 10 minutes to make and I am pleased with it's simplicity.
Hope you like it too
Related Posts Plugin for WordPress, Blogger...